The current trend of shooting in widescreen is unmistakable. Using vintage projection lenses is one way to achieve this look with affordable anamorphic attachments.
Shooting with anamorphic lenses carries a certain mystique – especially when using vintage glass, as it produces a unique look. Many enthusiasts strive for this – and often resort to unusual methods.
The basic idea behind shooting with an anamorphic lens is to squeeze the image horizontally during recording, in order to capture as much visual information as possible. In post-production or during projection in the cinema, the image is then unsqueezed back to normal. In the early days of this technique, it was possible to use the same – and in some cases literally the very same – lens for filming in one orientation and for projection in the opposite orientation. That opens up some special possibilities, which will be explained below.
“Widescreen” or CinemaScope was originally a concept in cinema, but it’s increasingly catching on online as well. Well-known CinemaScope films include Apocalypse Now, Blade Runner, Indiana Jones, Mission: Impossible, and several Star Wars installments. The most common anamorphic process produces an aspect ratio of about 2.40:1 or 2.35:1 on screen.
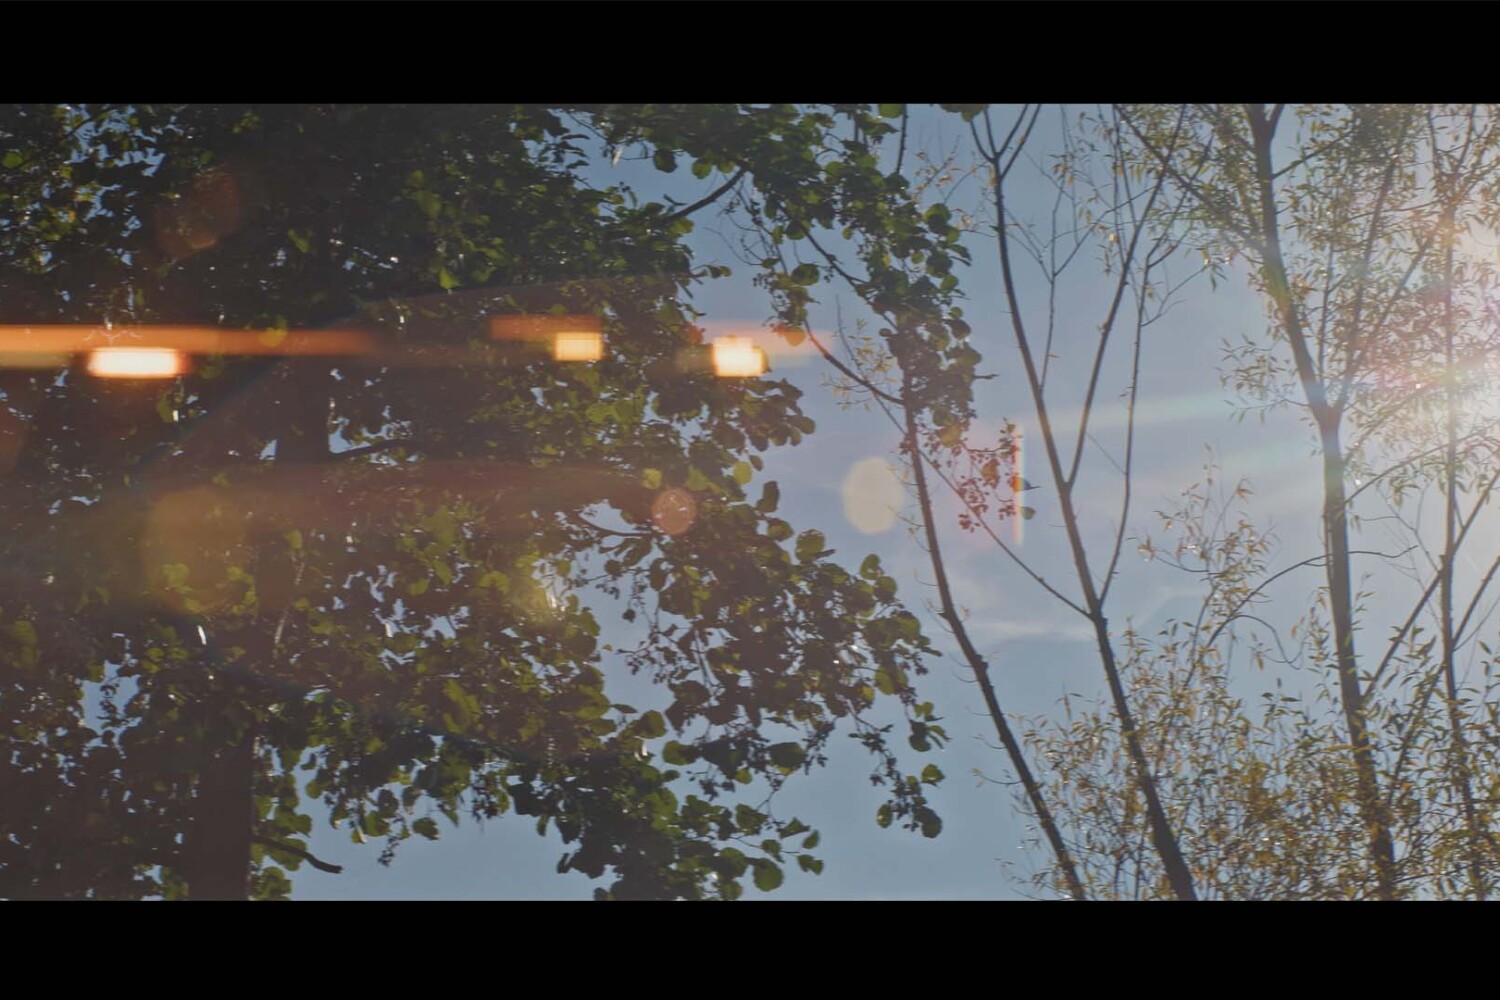
What’s special about this technique – beyond the wider aspect ratio – is a very specific image character. You could also say it’s the unique optical quirks. The most famous of these – elevated to cult status not least by Michael Bay’s films like the Transformers series – are the horizontal lens flares. The bokeh also changes: you can see this best in point lights that are out of focus, because they appear not as round dots, but as ovals.
Historical Background
To understand how the whole system works, we need to dip a bit into history. As is often the case, the origins here lie in military technology. To be precise, the first anamorphic concepts can actually be found as early as the 17th century in painting.
Let’s imagine a submarine or tank commander looking through his periscope. He wants to survey the area around his vehicle. He can see distant enemies well through the periscope because, like a telescope, it magnifies distant objects. However, there might be other people to the enemy’s right and left. So it would be practical to develop a lens system that covers the telephoto range while being wide-angle horizontally, in order to see as much of the field or ocean as possible. In other words, two different focal lengths for the vertical and horizontal in one lens.
That pretty much describes an anamorphic lens. Translating this to the film world, it looks like this: an anamorphic 50 mm lens with a 2× squeeze still has a focal length of 50 mm vertically. But because the anamorphic element squeezes the image by a factor of 2 horizontally, the horizontal field of view is equivalent to 25 mm, capturing twice the image width. A 2× squeeze is almost perfect for 4:3 sensors, since it results in a 2.40:1 image on playback with minimal cropping. (A squeeze factor of 1.33× would be ideal for 16:9 sensors.)
And speaking of 4:3, that finally brings us to the origins of the anamorphic process in film, since traditional 35 mm analog film has a 4:3 frame.
In the 1950s and ’60s, film studios were on the lookout for new innovations. These included experiments like 3D and Cinerama, which didn’t keep audiences entertained for long because they were not yet very refined. 20th Century Fox eventually jumped on the widescreen bandwagon and bought the anamorphic technology invented much earlier by Henri Jacques Chrétien (a French astronomer and inventor). Chrétien called his first lens Hypergonar. 20th Century Fox used it for the 1953 film The Robe (German title: Das Gewand, directed by Henry Koster) and branded the process CinemaScope.
This marketing term remains synonymous with the anamorphic process to this day, even though it’s technically a trademark registered by Fox (similar to how Steadicam is often used generically). Mathematically, the CinemaScope process with a 2× squeeze factor allowed an aspect ratio of 2.66:1. With a narrow magnetic sound stripe on the release print, the image format was 2.55:1, and with an optical sound track on the print, 2.35:1.
This is notable because in the period that followed there were many changes to the image area, yet the anamorphic lenses – both camera lenses and projection lenses – generally retained the 2× factor for squeezing and unsqueezing. To simplify a bit, one can say that films up until 1957 were shot for projection at 2.55:1. After that, the projected image area was made slightly smaller, in part to hide the splice line between reels. From 1958 until around 1970, an aspect ratio of 2.35:1 was in vogue, and then 2.39:1, which is still the SMPTE standard today. In general, when people say “CinemaScope”, “2.35” or “2.40” today, they are referring to this format.
Naturally, when anamorphic technology emerged, other film studios wanted a piece of the pie – and so, to avoid paying license fees, they coined all sorts of different names for their processes, all referring to the same technique. Panavision made a name for itself here, as the company developed high-quality anamorphic optics with minimal distortion at close focus.
For all practical purposes, the rest of the production and exhibition chain remained unchanged, since only the lenses on the cameras and in the projectors had to be swapped – cameras, film stock and projectors themselves stayed the same. With the advent of Super 35 mm and later digital cinematography, the anamorphic method lost some popularity, especially in Germany.
In order to use anamorphic technique on digital cameras, ideally you needed a sensor with a 4:3 aspect ratio. Arri met this need with the Alexa Studio, and other manufacturers followed suit. Additionally, many filmmakers today want to escape the “digital look” and use the anamorphic process not least for nostalgic reasons. This led to a kind of renaissance, and after the first Avatar 3D boom, one could observe rental houses once again offering more anamorphic lenses.
Look: What Defines the Anamorphic Look?

The flares and the oval bokeh, as well as the fact that an anamorphic lens effectively has two different focal lengths – which also means two different nodal points for light (one for the horizontal rays, one for the vertical) – are important elements of this special look. It is precisely because of these factors, along with a certain softness at the edges combined with slight image curvature, that this distinctive “anamorphic look” arises. Many even describe it as having a 3D-like quality. Actors appear more separated from the rest of the scene, and their faces look fuller; the word “organic” often comes up in descriptions.
Thanks to the special (and numerous) lens elements, highlights have a very particular glow. Different cinematographers will likely each emphasize very different characteristics, which shows just how complex the whole look is.
The lenses themselves are equally complex. Early anamorphic setups consisted of an anamorphic adapter block with cylindrical lens elements, and a normal spherical taking lens behind it. All of this had to be focused together, in parallel. On March 30, 1976, the company Isco filed a patent that made this need for parallel focusing of anamorphic and spherical elements obsolete — you only needed to focus using the anamorphic front attachment, which contained an additional variable diopter. Here is an excerpt from the patent:
“The front component may include a substantially afocal pair of spherically curved lenses of opposite refractivity, either or both of these lenses being axially shiftable to focus the objective; if this objective is equipped with its own focusing means, the latter may be immobilized in a predetermined position (preferably set for infinity) so that all the focusing may be carried out with the aid of this lens pair.”
Because of the many lens groups and the specialized use, anamorphic lenses are not exactly cheap. And it’s precisely this multitude of glass elements that is responsible for those characteristic image imperfections or unique quirks. Since the focal length of an anamorphic taking lens is about double that of a spherical lens for the same field of view, the background naturally ends up out of focus more often. With anamorphic optics, it’s particularly important to get a nicely oval bokeh – so ideally, these lenses should have as many aperture blades as possible.
Apart from the aforementioned variable diopter from Isco that sits in front of the anamorphic block, there are other technical solutions for focusing. Often the spherical and anamorphic lens groups are focused in parallel, which requires incredibly sophisticated engineering and results in very large lens bodies.
Another approach is the so-called “rear anamorphic adapter.” In this case, the anamorphic element is placed between the sensor and the primary taking lens. However, since this setup loses all of the usual anamorphic image characteristics, it’s often used only to capture as much image area as possible. Arri, on the other hand, developed a completely new system. We’re back to serious complexity here, so I won’t delve further into the design – that would go beyond the scope of this article.
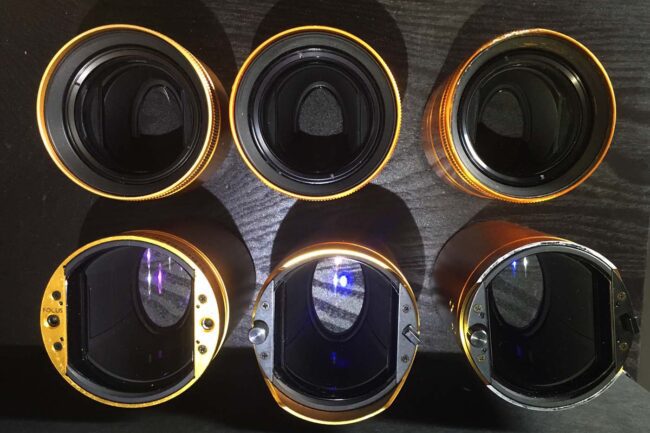
One company worth mentioning is Isco Göttingen, part of the Schneider-Kreuznach group. Early on, Isco produced very high-quality lenses for both cameras and projectors. The Iscorama 36 and Iscorama 54 were anamorphic front adapter lenses from the late 1970s that you could simply screw onto your normal camera lenses. You focused only with the front attachment; however, the Iscoramas have only a 1.5× squeeze factor. These lenses were the forerunners of today’s DIY trend in which anamorphic projector lenses are mounted in front of regular lenses. (More on that in a moment.)
Manufacturers: Cooke, Kowa, Vantage, Atlas, Panavision, Angénieux, Arri/Zeiss
Other manufacturers of anamorphic lenses include (or included) Kowa from Japan, Vantage Film with its Hawk lenses from Germany, Atlas with the Orion series, and of course Panavision, Angénieux, Cooke, and Arri in collaboration with Zeiss.
As different as these manufacturers are, their lens “looks” are just as varied. Cooke lenses are known for their vintage character, and Vantage Film also offers a vintage series. The old Kowa lenses are currently available rehoused from P+S Technik. The Anamorphic Master Primes introduced by Arri/Zeiss in 2013, by contrast, render a somewhat more modern image.
The current trend is toward a 1.8× squeeze factor – a sweet spot that preserves as much anamorphic character as possible while utilizing around 90% of the sensor area.
Since anamorphic lenses, as mentioned, are very expensive even to rent, it’s naturally worth looking for alternatives for smaller projects.
DIY Wave: Projection Lenses

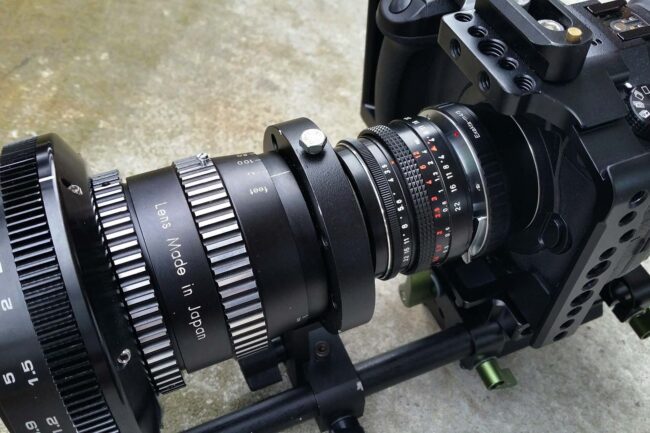
The first big do-it-yourself wave started after the transition from analog to digital in cinemas. The old but very high-quality projection lenses that had been used to de-squeeze anamorphic film images were suddenly no longer needed. Resourceful tinkerers took these sometimes quite heavy projector lenses and mounted them in front of their cameras, much like the Iscorama attachments mentioned above. This results in an anamorphic front block sitting in front of a spherical taking lens — which, in fact, is basically how the big manufacturers’ anamorphic lenses work as well.
Well, except for focusing… Initially, people made do with “double focusing” – meaning the anamorphic attachment and the spherical lens behind it had to be focused in tandem. Eventually, variable diopters came onto the market; you attach one in front of the anamorphic lens and then adjust focus only with that. This way, even simple projection lenses could function much like an Iscorama.
Besides the large models designed for 35 mm film, there are smaller ones too, some made for 16 mm or even 8 mm. A good example is the 8 mm anamorphic model from Isco called Inflight, which was used in airplanes.
If you have a good, sharp projection lens, a quality variable diopter, and a solid spherical lens with as many aperture blades as possible, you can assemble a very high-quality setup. These days there are mounts and adapters to attach projection lenses to cameras with minimal fuss and to make swapping focal lengths easier. Rapido Technology in the USA specializes in this and offers adapters for almost every old projector lens.
The only thing to watch out for is focal length, because these projection lenses are designed to throw an image at a certain distance – which means many of them will start vignetting on full-frame sensors at focal lengths of 50 mm and below.
By the way, anyone searching on eBay will still find lenses labeled Hypergonar. Using a Hypergonar lens developed by Henri Jacques Chrétien, arguably the first anamorphic short film Construire un feu was shot in the late 1920s with an aspect ratio of roughly 2.66:1.
Second Wave: GH5
The second wave was ushered in by Panasonic when the Lumix GH5 came out, featuring a 4:3 sensor and in-camera anamorphic de-squeeze. The prices for used projection lenses skyrocketed — people were buying and selling, hoarding and speculating.
 Thus, old projection lenses found a new lease on life. In addition to the aforementioned Iscoramas, models from Kowa and Möller became highly sought after, as they are compact and produce a very distinctive vintage look.
As interest continued to grow, startups began popping up here and there, promising affordable entry-level anamorphic lenses. Sirui and Vazen are two manufacturers worth mentioning that offer relatively inexpensive anamorphic glass. However, the author would advise against interim solutions like those from SLR Magic.
Projection lenses, too, can deliver either a modern “clean” look or a vintage-style look. Another video example at the end of this article shows this in action.